Skip to content
Jetpack Compose
— Android, Jetpack — 2 min read
Jetpack Compse
- Android를 위한 선언형 UI Toolkit
- xml이 아닌 kotlin 으로 작성되기 때문에 kotlin 코드 처럼 dynamic 해질 수 있다.
- @Composable 함수는 코틀린으로 작성된 다른 함수들 같이 사용될 수 있다.
- XML이 특정 상태에 따라 UI가 어떻게 보여질지에 관한 것이였다면, Compose는 특정 상태에 따라 UI가 무엇을 보여주는지에 대한 구현이다.
1@Composable2fun MyApp(names: List<String> = listOf("World", "Compose")) {3 Column {4 for (name in names) {5 Greeting(name = name)6 }7 }8}Compose 에서 기억해야할 것
- Composable 함수는 순서와 관계없이 실행될 수 있다.
- Composable 함수는 동시에 실행할 수 있다.
- Compose가 멀티코어를 활용하고, 화면에 없는 기능을 낮은 우선순위로 실행할 수 있다.
- Recomposition이 일어날때 특정 Composable 함수와 람다 함수들을 건너뛸 수 있다.
- Recomposition은 상태에 따라 취소되고, 다시 시작할 수 있다.
- Child mesaure는 한번만 할 수 있다. 두번하면 runtime Exception 발생
State 관리하기 !!!!!
Compose는 선언형이기 때문에 값을 바꾸기 위해서는 Compose함수에 다른 값을 전달하는 방법 뿐이다. 보통 이 값을 UI State라고 한다. State가 업데이트 될 때 마다, recompositon이 수행된다. TextField같은 위젯은 xml과 달리 스스로 값을 업데이트하지 않는다. Composable은 명시적으로 state가 바뀌었음을 알려줘야 업데이트가 일어난다.
Composable 에서는 remember라는 것을 이용해서 상태 값을 관리할 수 있다. remember는 mutable 또는 immutable 객체로 사용가능하다.
1val mutableState = remember { mutableStateOf(default) }Stateful vs Stateless
Flutter에서 사용되는 StatefulWidget과 StatelessWidget과 유사한 개념이다. 상태가 있는 곳에서는 값을 바꾸거나 상태를 기억할 수 있고, 상태가 존재하지 않는 곳에서는 값을 바꾸거나 상태를 기억하지 못한다.
Compose에서 remeber로 상태를 관리하고, 기억하는 것은 Stateful, 즉 상태를 가지는 위젯이다. Stateless 위젯은 어떠한 상태도 가지지 않는 위젯을 뜻한다.
Jetpack Compose Tutorial & 구성요소들
@Composable
- function/lamda에 사용할 수 있다.
- UI를 구성하는 함수에 어노테이션 추가
@Preview
- Preview 할 함수에 어노테이션사용
- @Composable 어노테이션이 붙어있는 method에서 사용가능
- Params
- name: 패널에 표시되는 Preview 이름
- group: Preview의 그룹이름. Preview를 그룹핑하고 그룹에 속한 프리뷰를 여러개 보여줄 수 있음
- apiLevel: 렌더링되는 API 레벨
- widthDp: 최대 넓이 DP, viewport의 렌더링 사이즈를 제한하기 위해 사용됨
- heightDp: 최대 높이 DP, viewport의 렌더링 사이즈를 제한하기 위해 사용됨
- locale: 현재 사용자의 locale
- fontScale: 사용자 기본 설정
- showSystemUi: True로 설정하면 상태바, 액션 바와 같이 기기에서 사용하는 화면이 표시됨
- showBackground: True로 설정하면 기본 배경화면 색상 적용
- uiMode: android.content.res.Configuartion.uiMode
- device: Preview에 사용할 device 지정

Text
- TextView
- Params
- text : 보여줄 text
- modifier: Layout node에 적용되는 modifier
- color: Text에 적용되는 색상, 명시되지 않으면 LocalContentColor로 적용됨
- fontSize: Text의 사이즈
- fontStyle: 적용될 typeface
- fontWeight: 폰트 굵기 적용값, ex) FontWeight.Bold,,,
- letterSpacing: 자간 간격
- textDecoration: 밑줄과 같은 텍스트 데코레이션 값
- textAlign: 텍스트의 정렬
- lineHeight: 문단의 높이
- overflow: overflow가 되었을때 어떻게 다뤄질지에 대한 설정
- softWrap: text가 줄바꿈을 수행해야하는지에 대한 것, false로 설정된 경우 가로로 무한한 공간을 차지함. softWrap값이 false이면 overflow와 textAlign이 기대하는 것과 다른 동작을 할 수 있음.
- maxLines: text가 가지는 최대 줄수 제한
- style: Text의 color, font, lineHeight와 같은 스타일 값
1@Composable2fun Text(3 text: String,4 modifier: Modifier = Modifier,5 color: Color = Color.Unspecified,6 fontSize: TextUnit = TextUnit.Unspecified,7 fontStyle: FontStyle? = null,8 fontWeight: FontWeight? = null,9 fontFamily: FontFamily? = null,10 letterSpacing: TextUnit = TextUnit.Unspecified,11 textDecoration: TextDecoration? = null,12 textAlign: TextAlign? = null,13 lineHeight: TextUnit = TextUnit.Unspecified,14 overflow: TextOverflow = TextOverflow.Clip,15 softWrap: Boolean = true,16 maxLines: Int = Int.MAX_VALUE,17 onTextLayout: (TextLayoutResult) -> Unit = {},18 style: TextStyle = LocalTextStyle.current19) {20 Text(21 AnnotatedString(text),22 modifier,23 color,24 fontSize,25 fontStyle,26 fontWeight,27 fontFamily,28 letterSpacing,29 textDecoration,30 textAlign,31 lineHeight,32 overflow,33 softWrap,34 maxLines,35 emptyMap(),36 onTextLayout,37 style38 )39}Usage
1Text(2 text = "${message.body}",3 style = MaterialTheme.typography.body2,4 modifier = Modifier.padding(all = 4.dp),5 color = MaterialTheme.colors.secondaryVariant6 )Layout
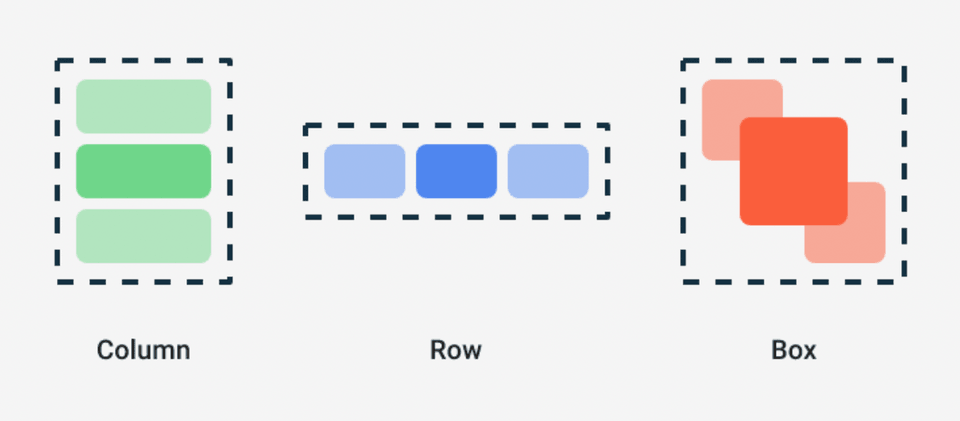
- Jetpack Compose 에는 세개의 기본 레이아웃 정렬이 있다.
- Colum
- Row
- Box

Colum
- view를 수직으로 정렬할때 사용된다.
1@Composable2inline fun Column(3 modifier: Modifier = Modifier,4 verticalArrangement: Arrangement.Vertical = Arrangement.Top,5 horizontalAlignment: Alignment.Horizontal = Alignment.Start,6 content: @Composable ColumnScope.() -> Unit7) {8 val measurePolicy = columnMeasurePolicy(verticalArrangement, horizontalAlignment)9 Layout(10 content = { ColumnScopeInstance.content() },11 measurePolicy = measurePolicy,12 modifier = modifier13 )14}- LazyColum을 사용하면 list를 만들 수 있다.
- LazyColum은 안드로이드의 Recyclerview와 같다.
1@Composable2fun LazyList() {3 // We save the scrolling position with this state that can also 4 // be used to programmatically scroll the list5 val scrollState = rememberLazyListState()6
7 LazyColumn(state = scrollState) {8 items(100) {9 Text("Item #$it")10 }11 }12}Usage
1@Composable2fun MessageCard(msg: Message) {3 Column {4 Text(text = msg.author)5 Text(text = msg.body)6 }7}Row
- view를 수평으로 정렬할 때 사용
1@Composable2inline fun Row(3 modifier: Modifier = Modifier,4 horizontalArrangement: Arrangement.Horizontal = Arrangement.Start,5 verticalAlignment: Alignment.Vertical = Alignment.Top,6 content: @Composable RowScope.() -> Unit7) {8 val measurePolicy = rowMeasurePolicy(horizontalArrangement, verticalAlignment)9 Layout(10 content = { RowScopeInstance.content() },11 measurePolicy = measurePolicy,12 modifier = modifier13 )14}Modifier
- Compose UI 요소들을 꾸미고, behavior를 지정함.
- 예를 들면 배경, 패딩, 클릭 이벤트 리스너 등등
Button
- Button
Customizing Layout
- Modifier.layout 사용시 measurable, constraints 두개의 파라미터가 주어진다.
- measurable: 자식이 위치하고 크기가 정해질것
- constraints: 자식의 최소, 최대 넓이와 높이
1fun Modifier.customLayoutModifier(...) = Modifier.layout { measurable, constraints ->2 ...3})Constraint Layout
dependency 추가
1// build.gradle2implementation "androidx.constraintlayout:constraintlayout-compose:1.0.0-alpha07"- Reference는 createRefs() 를 호출하여 만들어진다.
- constraint로 참조할 compose에 createRefs()를 호출하여야 reference로 사용가능
- constrainAs 사용하여 constraint 추가
- linkTo 와 같은 함수로 constraint 설정
1@Composable2fun ConstraintLayoutContent() {3 ConstraintLayout {4
5 // Create references for the composables to constrain6 val (button, text) = createRefs()7
8 Button(9 onClick = { /* Do something */ },10 // Assign reference "button" to the Button composable11 // and constrain it to the top of the ConstraintLayout12 modifier = Modifier.constrainAs(button) {13 top.linkTo(parent.top, margin = 16.dp)14 }15 ) {16 Text("Button")17 }18
19 // Assign reference "text" to the Text composable20 // and constrain it to the bottom of the Button composable21 Text("Text", Modifier.constrainAs(text) {22 top.linkTo(button.bottom, margin = 16.dp)23 })24 }25}- ConstraintLayout에서 사용하는 guildLine, barrier, chain 등을 사용할 수 있다.
- barrier는 ConstraintLayout안에서 생성될 수 있다. constrainAs안에서는 생성 불가
1val barrier = createEndBarrier(button1, text)